"UFO building"--Portland Oregon, during Occupy Portland movement
If you have made it here, then you have probably noticed what has happened to my blog, Mostly Macros. The blog which I have been building on for over 7 years was destroyed by an unknown problem. Currently Google has no comment despite my repeated requests. I figure it is most likely that my email address was hacked or hijacked somehow. This is a big loss--100s of pictures, and years of work gone forever since my wife and I lost nearly everything in a house fire in 2009, including many of my pictures. I refuse to be kept down however, I will continue to post here at this site as I collect and re-build as much as I can with new and older pics. I still have 1000s of pictures I want to share. It often takes an average of 1 hour per picture for me to upload when you count all the other things I must do. So give me time to rebuild--and you will see some new and interesting stuff here. This is the same Mostly Macros, but a new blog had to be created and I see it as a new beginning. The first Mostly Macros blog got over 44,000 hits before it was tragically shut down for yet unknown reasons. I still have no word from anyone as to why the account was disabled. According to what I have heard, it was probably someone trying to hack my email address and so Google stopped it by shutting down the account. I have been told if you want to keep your blog secure, change your password every month.
--Gabe Beasley
Mostly Macros photography
KF7DFP <--ham radio call sign
This blog is UNDER CONSTRUCTION so please forgive errors and things not yet setup.
I am not one to give up. This new site "Mostly Macros 2012" is going to be better then the first one I think. I took this shot in a mirror with my D7000 a while back. I used a manual 50mm lens f1.8. I have taken a lot of pictures and done many videos, but due to how much work it takes I have not posted as many as I wanted. I will do what I can to bring you new and stunning images that I catch with my lens. I will also begin to talk about my other big lifelong interest, physics and electronics. This is NOT just an electronics blog--many subjects and pictures will be covered here.
"The ark"-- My 100kv power supply throws a nearly 4 inch ark with ease continuously. This pic is a snapshot taken from a video that I will eventually post on this blog.
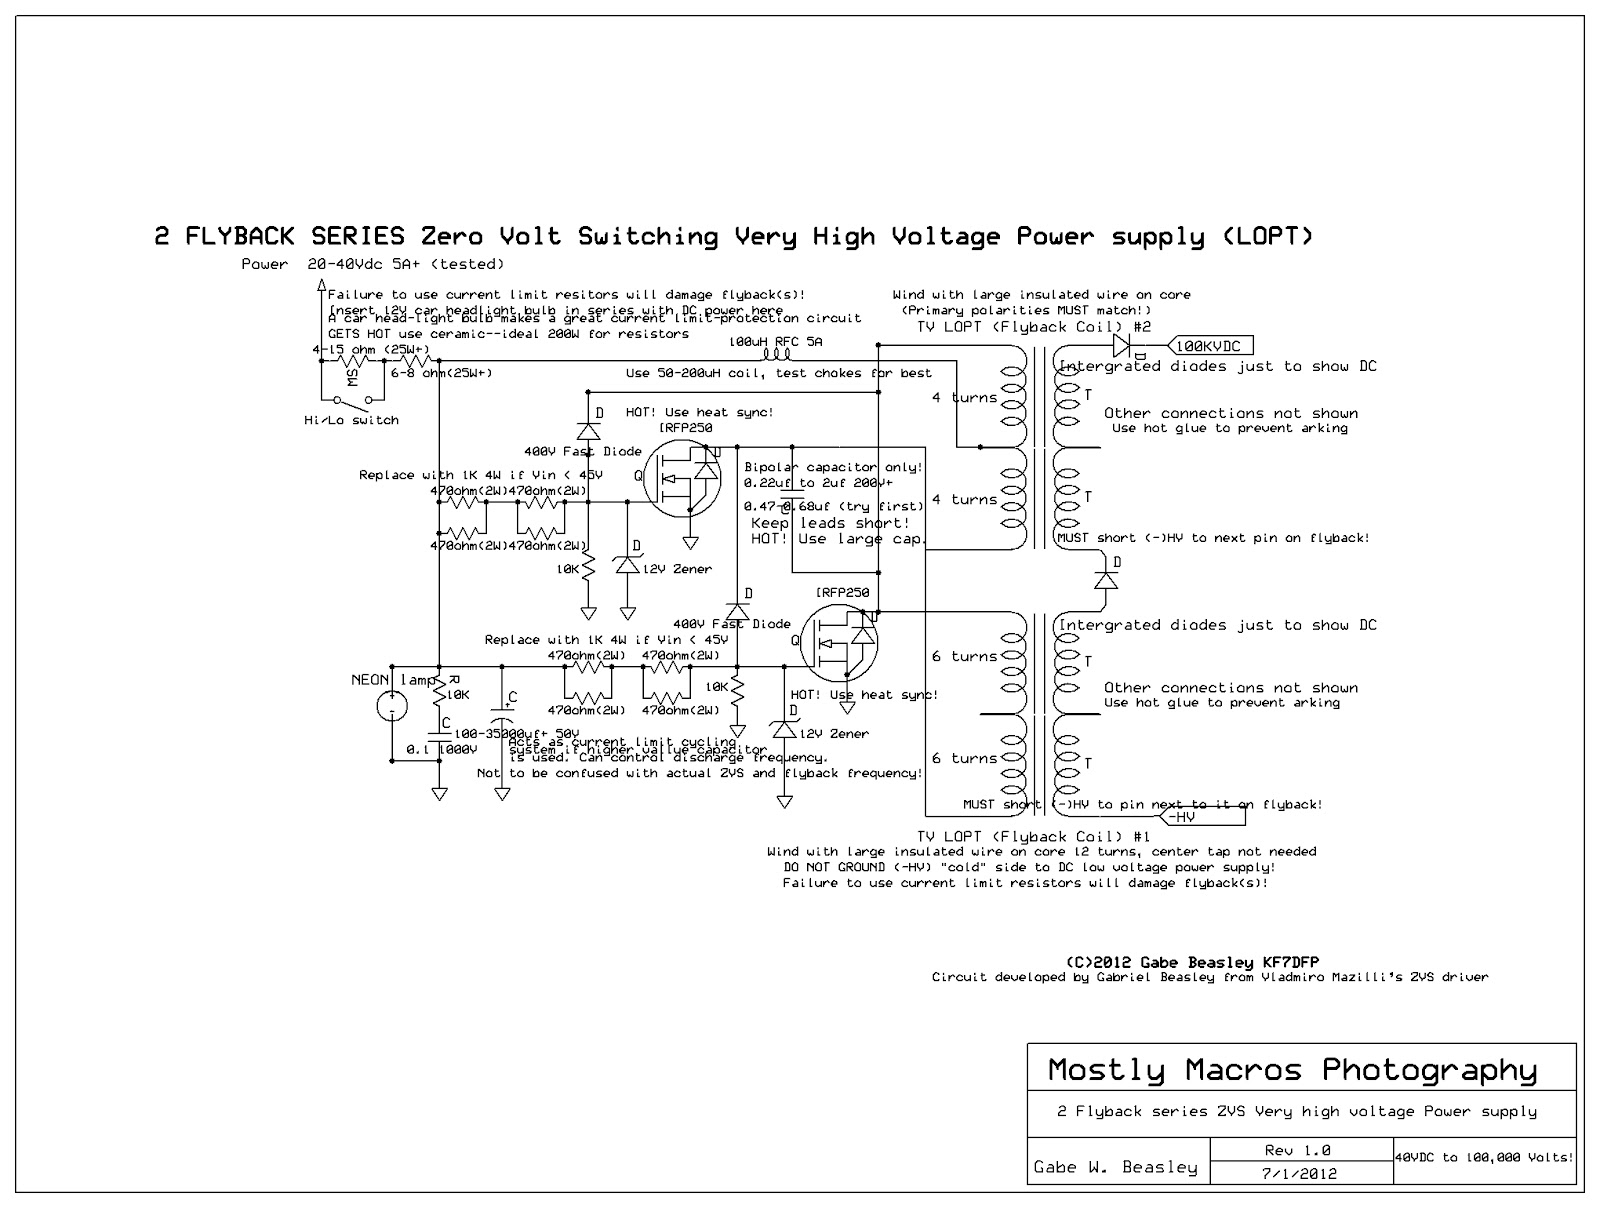
The other pictures of my 2 flyback series Zero volt switching power supply will also be posted soon. As well as videos. The ark can reach over 10cm at full power. That is more then 100,000 volts! The supply can generate about 20,000 to about 100,000 volts with an adjustable power supply I also built. It runs on 24 to 48VDC and produces enough power to do a number of experiments such as creating lasers and eventually a full indoor Tesla coil. It may soon be the biggest "singing arc" on UTUBE! I just need some parts, I plan to mainly use it for photo shots and stuff. You can buy something similar for several hundred dollars. I built my own. I modified a design on the internet after I read that it was "impossible" to use 2 TV flyback transformers in series. I like a good challenge, so I developed this circuit which does just that and proves it can be done with incredible results. I have an extensive background in electronics and already have drawn up the schematic which can be seen below. The hand-drawn one is a bit better in my opinion but I figured this is readable. It was my first circuit designed with this software. Warning! This circuit is very dangerous! If you build it--I assume NO responsibility. Be careful!

Double click on this schematic to view. Then use your back arrow to return to my site. This circuit MUST be current limited or you will FRY you flybacks and worse. I recommend using a 50W 12v lamp to act as a ballast and protect the circuit from overload. This prevents it from pulling more then about 4amps. At 40volts the bulb might blow like a fuse if a series problem happens. Even at 50v, when normally operating it should glow slightly but not much. This is a trick I came up with that greatly reduces the number of parts that have to be replaced when you are working with high current applications. You can add more bulbs in parallel to increase current load limits. Do not operate above 50volts. It will run up to as much as 70VDC or so but not for very long! My first attempt threw a 6 inch ark and then a flyback failed. The 12V zener diodes and resistances used can only handle about 50volts. Since I have no reason to go higher and the flybacks probably can't handle it--I will not describe the mods needed to try. It is possible to push a lot more current and voltage out of the circuit but I wanted a stable and trustworthy HV power supply not the biggest ark ever. Still, the ark is more impressive then most on the internet when it comes to home made HV without a full Tesla coil. The 12volt lamp which you should put in series with the entire circuit as well as some other current limiting ceramic resistors as shown to regulate power output. The rest can be done with your DC power supply. I just used a bridge and capacitor with a center tapped 50volt 4amp transformer. It also has a series circuit that lets me cut down on current at the AC side so I have 4 different settings of HV output controlled by 2 switches. If I remember I will post the power supply schematic once I draw it. I have built many approaches to making flyback HV and every time I find a new one that is in my budget to build--I build it.
I have also got very good results from a 555 timer that drives a 1 mosfet (pictures later) which I use to run an ignition coil or AC flyback for a plasma display. However--the ZVS is probably the best circuit out there for building your own HV supply with flybacks and some other transformers. It must be able to at least provide 15-50volts at 4amps. Test using batteries--lead acid are good. You need several amps. This circuit can be touchy so be sure to build it on a breadboard first to work out any problems. Keep leads short. Incredibly, believe it or not, using a 12volt series 50W bulb such as a car headlight or one of those halogen lamps you can buy at just about any store ($8 bucks for a pack of 3) --does not reduce output much but goes a long ways to protect things in the circuit especially if something goes wrong. The bulb acts like a pressure release valve so in that way it keeps things from getting out of hand. Circuits like this can be difficult to get right, so be careful! Order at least 1 backup part for every part involved. This schematic is my take on the ZVS. I could write a lot more about it but for now if you have any questions email me. Videos and project pictures will soon be posted. I was limited to show some parts with my software but this circuit does work very well. Do NOT ark for more then a few seconds as it can damage the flybacks at these voltages. Be sure to check temperatures of all parts involved. The primary windings must be insulated wire and make sure NO arching happens with hot-glue or mineral oil. This circuit can be ran for a long time on low power, but at full power it should not be operated for more then 1 min or so at a time, especially if running something that uses lots of the HV.

The "plasma force-field". This is actually just a Jacobo's ladder running fast. A Jacobo's ladder is usually two wires carefully put together. The electricity starts arching at the bottom where there is a smallest distance between the wires and thus the least resistance. Once on, the arc increases in temperature and begins to make the air just above it more conductive then even the bottom because it is super heated. Thus just like any heat, the arc rises up the ladder even though the wires get farther and farther apart. Once it reaches the top (or the limits of your voltage/current) the ark breaks. This happens because the resistance becomes less at the closer space between the wires at the bottom of the ladder all over again when the ark is no longer able to seek a better connection. At the top, there is no where else to go so the arc cannot rise anymore or even hold it's state. Thus it breaks and again follows the path of least resistance which becomes the bottom of the ladder. This is where the wires are closest together. This if done right, makes an awesome show as an arc will dance up two wires shaped like a V at different speeds and intensities depending on electrical conditions. Many of them can be seen in older science fiction movies. It was produced with a simple flyback driver that uses 1 high voltage power transistor from an old TV. Many of these can be found in color tube TVs. They are FAR better at running flybacks then the 2N3055. Those transistors were built to run flybacks and handle really high voltages! I also modified the 1 transistor flyback oscillator seen often on line to operate with the flybacks original connections and figured out the lead connections on several of my flybacks so that I can. This is not that hard, just use a 50ohm resistor when testing to limit current so you can't damage the transistor. Use only 12v. I don't run the single transistor drivers off of more then 24volts. The transistor can blow at 30volts and you must use current limiting here as well. A reason NOT to break off the leads on the bottom of the coil! They can be far more effective with some circuits at powering the flyback. I have yet to draw up this schematic on computer, when I do I will post it if I remember to. This was my work area, you can see a powerful homemade capacitor in the background. It can store over 50,000 volts and throw a 3inch very loud ark.


And I have not forgotten about spiders! Mostly Macros 2012 will have many different kinds of pictures. Just a few days ago I shot an interesting species I have not seen often here in my back yard. I will be posting pictures of it soon. This was a tiny spider I found a while back and photographed. These shots were done using a D7000 and a modified extension tube macro setup.
I photographed this small spider as she walked on my bed.
Here is a good example of how small this spider is. I believe she is a juvenile, so identification is difficult.
Underside view of same spider, showing details. Click on picture for full view. To return to my site just use back arrow.
A face on shot--showing her eyes up top as well as palps which are very female looking. However, since this is such a young spider, it is hard to tell.
AWESOME NEWS !
In 2012 this picture was printed in the Trimet event calender. This marks my first time being published as a photographer. A great moment for me. Our local public transit system here really liked my shot and made it a nearly full page picture in December. This is down town Portland Oregon. 1000s of people got this calender and my first published picture!
Much more to come, this is my first post. I have a great deal of work to do to get this site going and actually looking good. Please come back anytime--there will be more pictures and I can promise that the new Mostly Macros will be even better then the last. It was a tragic loss, nearly 8 years of work--but this blog will grow. It is not just a technical blog--you really never know what I will post here, from news to strange things. It's just a way to show my photography and share my knowledge of the subjects I am interested in.